Guide to the Arduino Leonardo
To connect the Arduino Leonardo to your computer, you'll need a Micro-B USB cable. This USB cable provides power and data to the board. When programming the Leonardo, you must choose Arduino Leonardo from the Tools > Board menu in the Arduino IDE.
(:*toc:)
Differences from the Arduino Uno
In general, you program and use the Leonardo as you would other Arduino boards. There are, however, a few important differences.
Single processor for sketches and USB communication.
The Leonardo differs from previous Arduino boards in that it uses a single microcontroller to both run your sketches and for USB communication with the computer. The Uno and other boards use separate microcontrollers for these two functions, meaning that the USB connection to the computer remains established regardless of the state of the main microcontroller. By combining these two functions onto a single processor, the Leonardo allows for more flexibility in its communication with the computer. It also helps to lower the cost of the board by removing the need for an additional processor.
Serial re-enumeration on reset.
Since the Leonardo does not have a dedicated chip to handle serial communication, it means that the serial port is virtual -- it's a software routine, both on your operating system, and on the Leonardo itself. Just as your computer creates an instance of the serial port driver when you plug in any Arduino, the Leonardo creates a serial instance whenever it runs its bootloader. The Leonardo is an instance of USB's Connected Device Class (CDC) driver.
This means that every time you reset the board, the Leonardo's USB serial connection will be broken and re-established. The Leonardo will disappear from the list of serial ports, and the list will re-enumerate. Any program that has an open serial connection to the Leonardo will lose its connection. This is in contrast to the Arduino Uno, with which you can reset the main processor (the ATmega328P) without closing the USB connection (which is maintained by the secondary ATmega8U2 or ATmega16U2 processor). This difference has implications for driver installation, uploading, and communication; these are discussed below.
No reset when you open the serial port.
Unlike the Arduino Uno, the Leonardo doesn't restart your sketch when you open its serial port on the computer. That means you won't see serial data that's already been sent to the computer by the board, including, for example, most data sent in the setup() function.
This change means that if you're using any Serial print(), println() or write() statments in your setup, they won't show up when you open the serial monitor. To work around this, you can check to see if the serial port is open like so:
while (!Serial) ;
Keyboard and mouse emulation.
One advantage of using a single chip for your sketches and for USB is increased flexibility in the communication with the computer. While the Leonardo appears as a virtual serial port to your operating system (also called CDC) for programming and communication (as with the Arduino Uno), it can also behave as a (HID) keyboard or mouse. See the "Good Coding Practice" section below for a warning about using this functionality.
Separation of USB and serial communication.
On the Leonardo, the main Serial class refers to the virtual serial driver on the Leonardo for connection to your computer over USB. It's not connected to the physical pins 0 and 1 as it is on the Uno and earlier boards. To use the hardware serial port (pins 0 and 1, RX and TX), use Serial1. (See the Serial reference pages for more information.)
Differences in pin capabilities.
The Leonardo has some slight differences in the capabilities and assignments of various pins (especially for SPI and TWI). These are detailed on the hardware page.
Installing Drivers for the Leonardo
OSX
- The first time you plug a Leonardo into a Mac, the "Keyboard Setup Assistant" will launch. There's nothing to configure with the Leonardo, so you can close this dialogue by clicking the red button in the top left of the window.

Windows (tested on XP and 7)
The process for Windows XP and Windows 7 is similar. These screenshots are from an XP installation.
- Plug in your board and wait for Windows to begin its driver installation process. If the installer does not launch automatically, Navigate to the Windows Device Manager (Start>Control Panel>Hardware) and find the Arduino Leonardo listing. Right click and choose Update driver.
- If prompted to search for drivers online, choose "No, not this time". And click Next
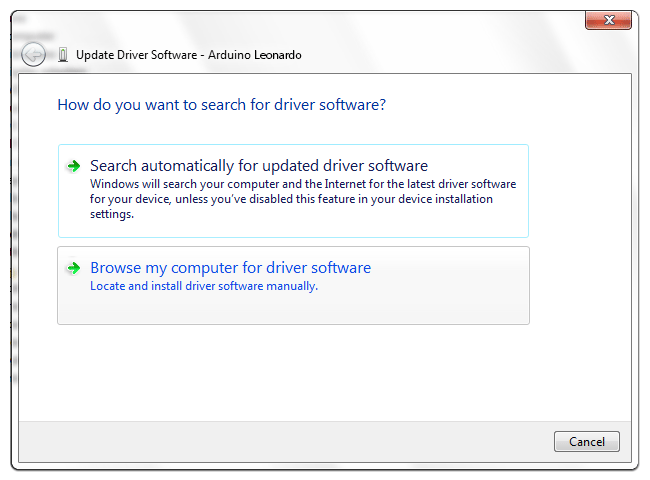
- When asked to install automatically or from a specific location, select "Install from a list or specific location" and press Next
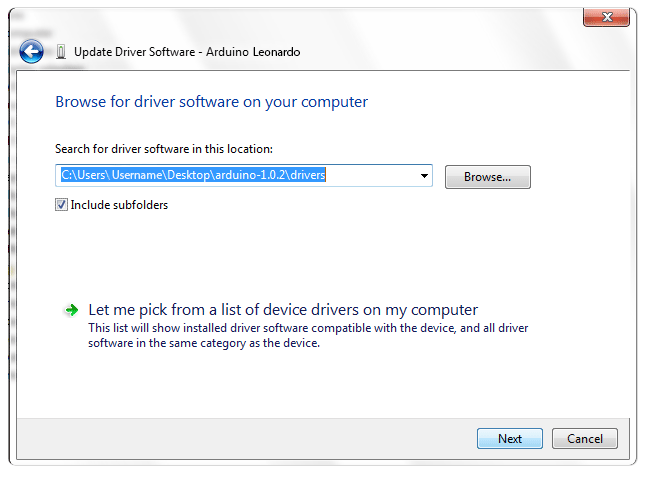
- Choose "Search for the best driver in these locations", and check the box "incude this location in the search". Click the Browse button and navigate to your Arduino 1.0.1 or later installation. Select the drivers folder an click OK
- Click Next
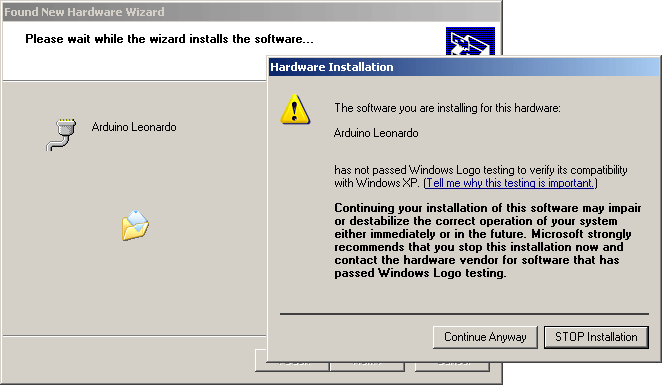
- You will receive a notification that the Leonardo has not passed Windows Logo testing. Click on the button Continue Anyway
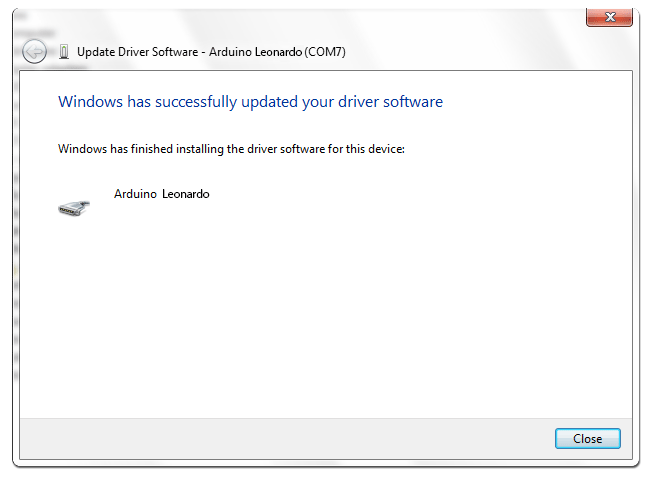
- After a few moments, a window will tell you the wizard has finished installing software for Arduino Leonardo. Press the Finish button
Linux
There is no need to install drivers for Ubuntu 10.0.4
Uploading Code to the Leonardo
In general, you upload code to the Leonardo as you would with the Uno or other Arduino boards. Click the upload button in the Arduino software and your sketch will be automatically uploaded onto the Leonardo and then started. This works more or less the same way as with the Uno: the Arduino software initiates a reset of the Leonardo, launching the bootloader - which is responsible for receiving, storing, and starting the new sketch.
However, because the Leonardo's serial port is virtual, it disappears when the boards resets, the Arduino software uses a different strategy for timing the upload than with the Uno and other boards. In particular, after initiating the auto-reset of the Leonardo (using the serial port selected in the Tools > Serial Port menu), the Arduino software waits for a new virtual (CDC) serial / COM port to appear - one that it assumes represents the Leonardo bootloader. It then performs the upload on this newly-appeared port.
These differences affect the way you use the physical reset button to perform an upload if the auto-reset isn't working. Press and hold the reset button on the Leonardo, then hit the upload button in the Arduino software. Only release the reset button after you see the message "Uploading..." appear in the software's status bar. When you do so, the bootloader will start, creating a new virtual (CDC) serial port on the computer. The software will see that port appear and perform the upload using it. Again, this is only necessary if the normal upload process (i.e. just pressing the uploading button) doesn't work. (Note that the auto-reset is initiated when the computer opens the Leonardo's serial port at 1200 baud and then closes it; this won't work if something interferes with the board's USB communication - e.g. disabling interrupts.)
Good Coding Practice With the Leonardo
A word of caution on using the Leonardo as a Mouse or Keyboard: if the Mouse or Keyboard library is constantly running, it will be difficult to program your board. Functions such as Mouse.move() and Keyboard.print() will move your cursor or send keystrokes to a connected computer and should only be called when you are ready to handle them. It is recommended to use a control system to turn this functionality on, like a physical switch or only responding to specific input you can control. When using the Mouse or Keyboard library, it may be best to test your output first using Serial.print(). This way, you can be sure you know what values are being reported. Refer to the Mouse and Keyboard examples for some ways to handle this.
Using the serial monitor effectively: Since serial is going through only one processor on the Leonardo, the board is capable of filling your computer's serial buffer faster than the Uno or earlier boards. You may notice that if you send serial continually, for example like this:
int sensorReading = analogRead(A0);
Serial.println(sensorReading);
}
the Serial Monitor in the IDE slows down considerably as it tries to keep up. If you encounter this, add a short delay to your loop so that the computer's serial buffer is not filled as fast. Even a millisecond delay will help:
int sensorReading = analogRead(A0);
Serial.println(sensorReading);
delay(1);
}
Serial applications using native libraries other than RXTX library read the serial buffer faster, so you may not encounter this error much outside of the Serial Monitor, Processing, or other RXTX-based serial applications
For more details on the Arduino Leonardo, see the hardware page and the Mouse and Keyboard reference pages.
The text of the Arduino getting started guide is licensed under a
Creative Commons Attribution-ShareAlike 3.0 License. Code samples in the guide are released into the public domain.